Explore the Power of Clipbook
By Laura Acklenwww.wpwriter.com
Once you discover the Clipbook™ utility in WordPerfect® 12, you'll wonder how you ever got along without it. The Clipbook supports multiple clipboards, so you can copy information from several different sources and then assemble it whenever you are ready.
Here's the best part: you can save these bits and pieces as clips in a clipboard. You can create as many clipboards as you want, and they can be shared over a network so that everyone has access. You might have one clipboard for stock responses to e-mail messages, another clipboard with contact information, one with Web addresses to Corel® Knowledge Base™ articles, one with signature blocks for staff members, and so on.
The Clipbook utility offers a distinct advantage for network system administrators because it gives them centralized control over standard paragraphs and company graphics. QuickWords™ and QuickCorrect™ entries can be designed to do the same thing, but they must be updated individually.
Starting the Clipbook
To start the Clipbook for the first time, you need to use the Start menu. On the Windows taskbar, click Start > Programs > WordPerfect Office 12 > Utilities > Clipbook to launch the Clipbook. You may expect to see a program window open, but if you look on the taskbar, you'll see a tiny icon of a white clipboard on a blue background (see Figure 1). You won't see the Clipbook window until you select and copy your first item.
![]()
Figure 1
When the Clipbook is launched, a Clipbook icon is added to the system tray.
If you want quicker access to the Clipbook, you can create a shortcut on your desktop. On the Windows taskbar, click Start > Programs > WordPerfect Office 12 > Utilities. Right-click Clipbook, and then choose Send To > Desktop (create shortcut). The shortcut looks similar to the icon in the system tray.
Copying an Item to a Clip
When the Clipbook is running, the shortcut keys for cutting (Ctrl + X) and copying (Ctrl + C) are reassigned — they now open the Clipbook window, where you can label and save the item. This can be a bit tricky if you're accustomed to using the default Windows shortcut keys for copying and pasting. Later in this tutorial, I'll show you how to select a different set of shortcut keys for the Clipbook.
To save a clip to a clipboard, select the item (text, sounds, or graphics), and either copy it by pressing Ctrl + C or cut it by pressing Ctrl + X. The Clipbook window appears with a list of keys: 0–9 and A–Z, for a total of 36 items in a single clipboard (see Figure 2).
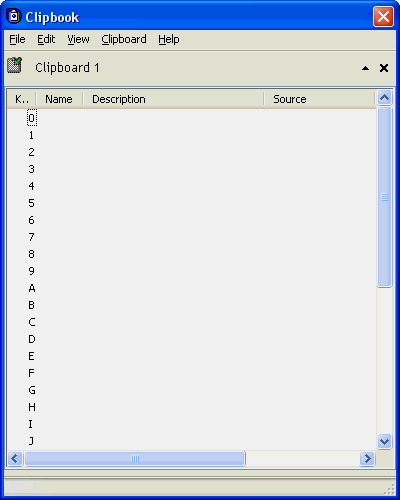
Figure 2
In this blank clipboard, you can select a key to assign to the new clip.
If you don't particularly care which key is used for the clip, just press Enter. The clip is automatically assigned to the next available key. If you do want to pick the key, you can either type the key number (or key letter) and press Enter, or double-click the key. For example, press Ctrl + C, 3, and then Enter; or press Ctrl + C, and then double-click 3 in the Clipbook window. Either way, the Clipbook window closes, so you can see the full screen again. You can now select other items as necessary. The clips are saved to the clipboard, so you won't lose them — even if you exit Windows before you've had the chance to paste them.
Pasting from the Clipbook
Likewise, when the Clipbook is running, the shortcut key for pasting (Ctrl + V) is reassigned. It now opens the Clipbook window, so you can choose which clip to paste. Again, if you want to continue to use the default Windows shortcut keys for cutting, copying, and pasting, you can choose a different set of shortcut keys for the Clipbook.
When you are ready to paste the item or items, simply position the insertion point, and press Ctrl + V to open the Clipbook window. You'll see a list of the clips that you have saved so far (see Figure 3). To paste a clip, you can either double-click the key, or type the key number or letter and then press Enter. For example, press Ctrl + V, 1, and then Enter; or press Ctrl + V, and then double-click the 1 in the Clipbook window.
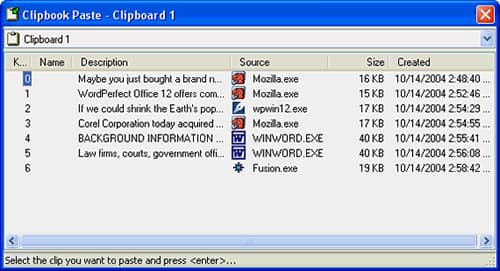
Figure 3
This clipboard has seven clips (0–6) that were gathered from various applications.
You can also use the mouse to move information from the Clipbook. It's easy to drag clipboard items into a document. To paste an item from a clipboard, simply drag the key from the clipboard to the desired position in a document; this action removes the item from the clipboard. If you want to paste the item and leave a copy of it in the clipboard, hold down Ctrl while you drag the key.
Note: Remember, if you don't select a specific key, a clip is saved in the first empty spot in the clipboard. If all the keys are full, the new clip overwrites the first clip in the list and is assigned the 0 key. Subsequent new clips overwrite existing clips in sequential order.
Editing Clips
A clip is easily edited. Rather than recreating it, make changes to it through the clip properties. Right-click the key, and choose Properties to open the Clip Properties dialog box (see Figure 4). The contents of the clip are shown in the Description box. Click in the box, and make the necessary changes. If you enter a title for a clip, it appears in the Name column of the Clipbook window. Click OK when you are finished.
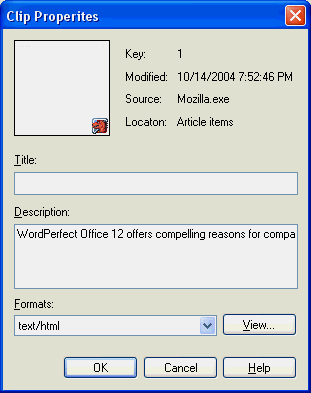
Figure 4
You can create a title for a clip and make changes to the contents in the Clip Properties dialog box.
Creating New Clipboards
The default clipboard is called Clipboard 1. This is the clipboard that you have been using up to this point. Because each clipboard can hold only 36 clips, you need to create additional clipboards as you go along. Multiple clipboards can be displayed in the Clipbook window, which can be resized to allow more room for the clips.
To add a new clipboard, right-click the Clipbook icon in the system tray and choose Manage, or in the Clipbook window, choose Clipboard > Manage. The Manage Clipboards dialog box appears (see Figure 5).
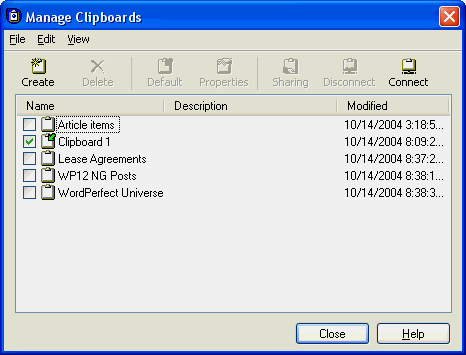
Figure 5
You can display multiple clipboards in the Clipbook window and can designate one of them as the default clipboard for saving clips.
The default clipboard is shown with a tiny green arrow in the upper right corner (next to "Clipboard 1" in Figure 5). Enable the check boxes next to the clipboards that you want to be displayed in the Clipbook window. Disable the check boxes next to the clipboards that you want to remove from the Clipbook window.
Sharing Clipboards
The Clipbook utility supports networked clipboards, so you can take advantage of information that other users have compiled. You can set any of your clipboards as shareable on the network. The clipboard can be configured to allow changes to the clips, or "locked" if you don't want the clips modified in any way.
To set a clipboard as shareable, choose Clipboard > Network > Sharing. In the Clipbook – Sharing dialog box, choose a clipboard, and then choose Sharing. In the Sharing dialog box, enable the Share this folder on the network check box. Then, enable the Allow network users to change my files check box if you want to allow changes, or disable it if you want to prevent changes.
To use a shared clipboard, you must connect to it. In the Clipbook window, choose Clipboard > Network > Connect. When you are finished with a clipboard, you use essentially the same steps to disconnect: choose Clipboard > Network > Disconnect.
Renaming and Deleting Clipboards
Clipboards can be renamed and deleted as necessary. To delete a clipboard, right-click the clipboard, and then choose Delete. Choose Yes to move the clipboard to the Windows Recycle Bin. To rename a clipboard, right-click the clipboard, and then choose Rename. Type a new name for the clipboard, and then press Enter.
Sharing Clips Between Clipboards
When you become more familiar with Clipbook, you may want to start organizing your clips according to specific projects or subjects. You need to organize the clips into clearly labeled clipboards — especially if you plan to put the clipboard files on a network to share with your co-workers.
To move and copy clips between clipboards, you must display the clipboards in the Clipbook window. Right-click the Clipbook icon in the system tray, and choose Manage (or if the Clipbook window is open on-screen, choose Clipboard > Manage). Enable the check boxes next to the clipboards that you want to display. You can also select the clipboards from the Clipboard menu.
To move a clip to another clipboard, right-click the key, and then choose Cut. Right-click a blank key in the destination clipboard, and then choose Paste. You can also select the clip and use the Cut and Paste commands on the Edit menu, or drag clips between clipboards.
To copy a clip to another clipboard, right-click the key and then choose Copy. Right-click on a blank key in the destination clipboard, and then choose Paste. To copy a clip with the mouse, select the key, and hold down Ctrl while dragging the clip.
Choosing Alternate Shortcut Keys
For die-hard shortcut key users, the hardest part of using the Clipbook utility is remembering that the default Cut, Copy, and Paste shortcut keys are reassigned by the Clipbook. Clipbook gives you several ways to bypass the utility for a quick copy and paste: Use the toolbar buttons; right-click a selection, and choose from the QuickMenu™; or choose an option from the Edit menu. When you use one of these methods, the item is saved to the Windows Clipboard. I decided to reassign the shortcut keys so that I could continue to use my favorite shortcuts for quick operations.
To reassign the shortcut keys for Clipbook, right-click the Clipbook icon in the system tray, and choose Settings, or if the Clipbook window is open, choose File > Settings. Click the Shortcut Keys tab to display the default settings for Cut, Copy, and Paste operations (see Figure 6).
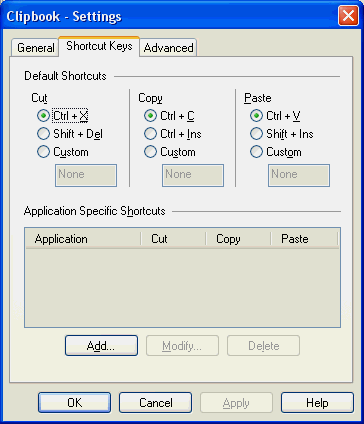
Figure 6
On the Shortcut Keys page, you can select which keystroke combinations to use as shortcuts for cutting, copying, and pasting clips.
Either choose one of the two preset keystrokes, or enable the Custom option button. Click in the Custom box, and then press the keystroke combination that you want to use. For example, I use Shift + Ctrl + X for Cut, Shift + Ctrl + C for Copy, and Shift + Ctrl +V for Paste. Choose OK when you are finished.
Launching the Clipbook During Start-up
I found that if I launch the Clipbook on start-up, I am much more likely to use it. Now that I've reassigned the shortcut keys, it doesn't get in my way, and it's there when I need it. To set the Clipbook to launch on start-up, right-click the Clipbook icon in the system tray, and choose Settings, or if the Clipbook window is open, choose File > Settings. On the General page, enable the Launch Clipbook at startup check box. Choose OK.