Comparing documents in WordPerfect
If you are working with someone else to create a document, you can collaborate more easily by using the document comparison functionality in WordPerfect®. It allows you to compare the current version of a document to an earlier version and display the changes that were made.
Specifying settings for comparing documents
Before performing a document comparison, you can specify various settings. For example, you can choose to compare the text word by word or, if you want to go into more detail, character by character. You can include certain document elements, such as headers and footers, in the document comparison. You can also generate a summary that includes the names of the original and modified documents. The summary also describes the attributes used to display deletions and insertions in the revised document.
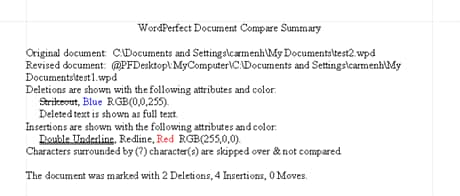
Figure 1
This document summary specifies that the deletions in the revised document are displayed in blue strikeout text and that insertions are displayed in red double-underline text.
In addition to the comparison summary, you can also generate a list of changes. The list enumerates all deletions, insertions, and moves that were made in the revised document.
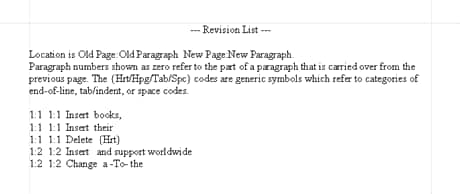
Figure 2
In this revision list, only a description of the changes made are displayed. The document text itself is not displayed.
- Click File > Document > Compare.
- Click Settings > Compare only.
- In the Document compare settings dialog box, click the Options tab.
- In the Marking precision area, enable one of the following options:
- Word — compares text word by word
- Character — compares text character by character
- In the Include in comparison area, enable any of the following options:
- Headers/footers – includes headers and footers in the document comparison
- Comments — includes comments in the document comparison
- Expand master documents – includes subdocuments in the document comparison
- In the Summary of comparison area, enable one of the following options:
- None — prevents WordPerfect from creating a summary
- Insert at beginning — inserts a summary of your comparison at the beginning of your document
- Insert at end — inserts a summary of your comparison at the end of your document
- In the List of changes area, enable one of the following options:
- None — prevents WordPerfect from creating a list of changes
- Show surrounding context — displays the change along with some of the text that appears before and after the change in the document. This helps you locate changes in the document.
- Show change only — displays only the changes made
Performing a document comparison
To compare one document to another, you first need to open a document in WordPerfect and then choose the document with which you want to compare it. You also need to decide if you want to display the changes in a new, revised document or in the open document.
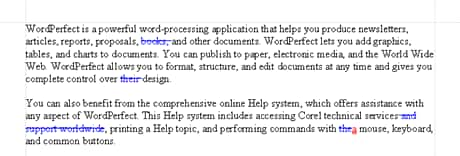
Figure 3
The deleted words appear in the revised document in blue strikeout text, and the added items appear in red double-underline text.
- Open the original document.
- Click File > Document > Compare.
- In the With box, type the folder and filename of the file against which you want to compare the original document.
>If you want to browse for the file, click the browse button.
- In the Show markings in area, enable one of the following options:
- New document — displays comparison results in a new document
- Current document — displays comparison results in the active document
- Click Compare only.