Using QuickPaste in Quattro Pro®
As you work with data in Quattro Pro®, you might have to move cells around the spreadsheet. The QuickPaste feature lets you automatically insert the correct number of cells for the data you copy or cut from one area to another. QuickPaste gives you exceptional control when pasting data. You can choose to simply paste the copied cells, which will displace existing cells. Or, you can insert new rows or columns so that existing cells remain in their original rows or columns.
Displacing existing cells
You can easily paste cells into a spreadsheet so that existing cells are displaced by the number of cells you're pasting. You have the option of displacing existing cells to the right or down. This forces existing data into rows or columns that didn't contain data.
- Select the cells containing the data you want to copy.
- Click Edit > Copy.
- Select the upper leftmost cell where you want to paste the copied data and cells.
- Right-click, and click QuickPaste.
- In the QuickPaste dialog box, enable the Partial option in the Span area.
The range of affected cells is displayed in the Cells box. You can highlight the affected cells that will be affected by clicking the Range picker button
 beside the Cells box.
- In the Dimension area, enable one of the following options:
• Columns — shifts cells to the right
• Rows — shifts cells down
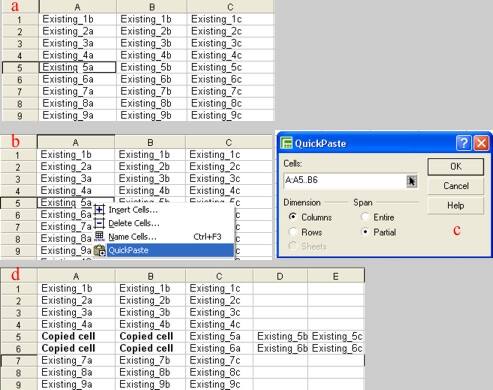
Figure 1
This is an example of: a) existing cells in a spreadsheet; b) accessing QuickPaste through the shortcut menu; c) setting options in the QuickPaste dialog box; d) pasting displaces existing cells.
Keeping existing cells in their original rows or columns
You can insert new rows or columns as you use QuickPaste, which keeps existing cells in their existing rows or columns. The only data in the new rows or columns is the cells you pasted.
- Select the cells containing the data you want to copy.
- Click Edit > Copy.
- Select the upper leftmost cell where you want to paste the copied data and cells.
- Right-click, and click QuickPaste.
- In the QuickPaste dialog box, enable the Entire option in the Span area.
- In the Dimension area, enable one of the following options:
• Columns — inserts as many columns in the spreadsheet as there are in the copied data and shifts cells to the right
• Rows — inserts as many rows in the spreadsheet as there are in the copied data and shifts cells down
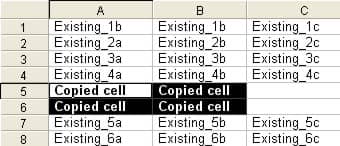
Figure
This is an example of copying cells in new rows and inserting existing data.