Creating a template with a Christmas theme
It's easy to modify your WordPerfect® template. You can add graphics or pictures to give your seasonal letters a personal touch. For this tip, we'll show you how we created the template shown below. You can follow along by using your own Christmas graphics or pictures.

The first step is to start a new template project by choosing File > New from Project. In the PerfectExpert dialog box, click the Create New tab, and choose [WordPerfect] from the list box. Click Options and choose Create WP Template from the pop-up menu. This will start a blank document template.
Next, we added the holly graphic to the upper left corner of the document margin. To add your own graphic or picture, choose Insert > Graphics/Pictures > From File. In the Select Image dialog box, select the graphic or picture you want to use and click Insert.
We had to resize the graphic to make it fit in the allotted space. Then, we dragged it into position. You can easily resize a graphic or picture by selecting it and dragging a corner handle until it is the size that you want.

With the upper left corner set, we then copied the graphic and pasted another one into the document. By copying and pasting, we could reuse the holly graphic with the same dimensions. Then, we selected the new holly graphic, right-clicked, and choose Image Tools from the pop-up menu.
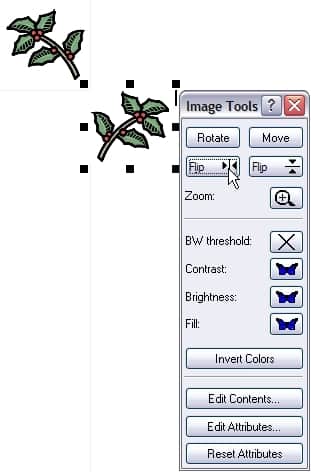
The Image Tools dialog box lets you adjust many aspects of a graphic or picture. For the right-hand corner, we wanted the holly to point to the right, so we clicked the Flip Horizontally button. Then, we dragged the graphic into position in the upper right corner of the document's margin. To use the holly for the bottom corners of the document, we copied and pasted it twice more. Then, we used the Image Tools dialog box to adjust the rotation of each graphic accordingly.
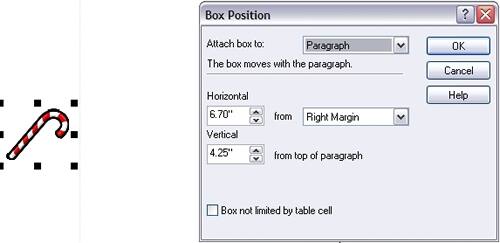
Next, we wanted to add a candy cane graphic to both the left and right margins. we inserted the image, resized it, and dragged it into position. To get it as close to centered as possible, we right-clicked and chose Position from the pop-up menu. In the Box Position dialog box, we typed 4.25 in the Vertical box and clicked OK.
Then, we copied the candy cane and pasted a new one into the document. After dragging it into the right margin, we again used the Box Position dialog box to center the graphic.
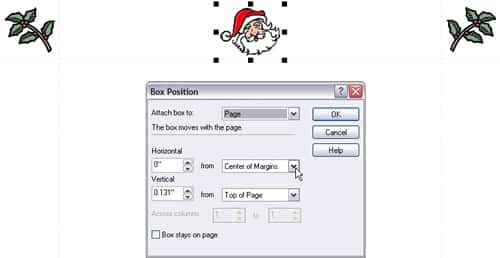
Of course, no Christmas template would be complete without the jolly old man himself, so next we added a graphic of Santa. we resized the graphic and dragged Santa toward the middle of the document's top margin. To set his position, we used the Box Position dialog box (right-click graphic, and choose Position from the pop-up menu). From the list box beside the Horizontal box, we chose Center of Margins.
Then, we copied Santa, pasted him into the document, dragged him to the bottom margin, and used the Box Position dialog box to center him on the page.
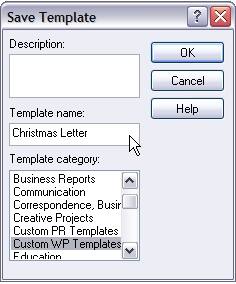
Finally, we saved the template by choosing File > Save As. In the Save Template dialog box, we typed "Christmas Letter" in the Template name box, chose Custom WP Templates from the Template category list, and clicked OK. When saving your own template, choose a name that you'll be able to identify later.
To reuse the Christmas Letter template, we choose File > New from Project. In the PerfectExpert dialog box, choose Custom WP Templates from the list box, select the Christmas Letter template, and click Create.
This tip should give you enough guidance to get started on creating your own template with a Christmas theme.