Getting more from WordPerfect Macros
Macros. Ugh!The word may sound ominous, but the idea behind macros is really quite simple: A macro is a shortcut that performs some automated task. Many tasks you perform with WordPerfect® are repetitions of things you do over and over. By making a shortcut out of these tasks, you can quickly become a more efficient WordPerfect user.
But better productivity isn't the only benefit. With macros you also get improved accuracy and more consistent documents. Because steps are repeated for you, you're less likely to make mistakes.
In this tutorial you’ll learn how to get more out of WordPerfect macros, including how to record your own, and how to use the built-in macros that come with WordPerfect. Also included in this tutorial is a step-by-step guide to the Client/Matter File Saver, a simple document management macro helps you keep track of your client documents. Use it as-is, or as a springboard for your own sophisticated document management helper.
What Macros are
Macros can either be recorded or programmed. Anyone can make a recorded macro. You activate the recording at the touch of a key. It’s kind of like the auto dialing feature on your phone. Instead of pressing the digits yourself to call your mother in Boise, you store her phone number in the phone’s memory. When you feel the urge to call, just press the button for “Mom.”
More than just recording steps, WordPerfect macros also support a rich programming language. You can extend WordPerfect with programmed macros that have built-in smarts.
Interested in what’s possible? WordPerfect X7 comes with a over three dozen ready-to-go macros just itching to show you what they can do. A handy way of reaching the built-in macros is by using the new Macro Manager feature in WordPerfect X7 (and higher) – choose Tools ▸ Macro ▸ Macro Manager. Scroll through the list and read up on what each does in the Description (Abstract) box.
Making your own Macros by recording them
You can make your own macros just by recording them. Once recorded, the macro can be played back at any time, perfectly repeating the exact same steps you originally made.
Here's how to record a macro:
- In WordPerfect place the insertion point where you want the recording to begin. Maybe you want to add a customized signature block for your letters. So put the insertion point at the bottom of a sample letter where the signature block is to begin.
- Turn on macro recording by choosing Tools ▸ Macro ▸ Record. Or as a shortcut press Ctrl+F10.
- Give your new macro a name in the Record Macro dialog box. Pick a descriptive name that will help you remember what the macro does. Keep the ".wcm" file extension. It tells WordPerfect the file is a macro.
- Recording begins, and everything you do now in WordPerfect is being stored. Type text, select formatting, set options – it's all remembered for you. Don't worry if you make a little mistake. Backspace over text you don't want, and try again
- When you're done, stop recording by choosing Tools ▸ Macro ▸ Record again (or press Ctrl+F10).
Tip: If you make too many mistakes while record, it's best to turn the recorder off, and try again. During macro recording, the Undo feature is disabled.
Now here’s to play back your recorded macro:
- Position the insertion point where the macro is to begin. This ensures that the same conditions exist when you originally recorded the macro. If you're playing your custom signature block macro, for example, be sure to start by placing the insertion point at the bottom of the letter.
- Select Tools ▸ Macro ▸ Play (or Alt+F10).
- Find your macro in the file list, and click the Play button.
Once you play a macro, it's name is added to the short list in the Macro menu pull-down (under Tools ▸ Macro). Your last nine played macros are shown. To replay a recent macro, just select it from this list.
Using Macros that come with WordPerfect
WordPerfect X7 (and newer versions) come with a over three dozen ready-to-go macros Some are strictly utilitarian, like AllFonts, which makes a formatted list of all the fonts on your system. Or there’s the EndFoot macro, which converts all endnotes in a document to footnotes. (There’s also its close cousin, FootEnd, which does the opposite.)
Other macros are shortcuts to otherwise lengthy formatting steps: Thumbnail Current Page takes a thumbnail snapshot of the current page so you can view it in Windows Explorer; Reverse, which reverses text and background colors; and Send To TextBox, which moves the selected text to a character anchored text box. Great for making pull-quotes.
And of special interest to law firms, there’s Bates Numbering(creates a series of labels for a document collection), Pleading (creates a pleading document, with options), and Numbered Save (saves a document with a version number added to the filename).
To demonstrate the power of WordPerfect 's built-in macros, let’s try out one. A favorite of mine is the FileStmp macro, which inserts the name of the current document anywhere in the document. The name FileStmp is shorthand for "file name stamp."
- Create a new document, and type some random text. Anything will do.
- Save the file in your documents folder. For this demonstration use FileStampTest.wpd as the filename.
- Choose Tools ▸ Macro ▸ Macro Manager. The PerfectScript Macro Manager dialog box opens. It displays all the macros in your default macro folder.
- In the list on the left, locate FILESTMP, and click the Run button.
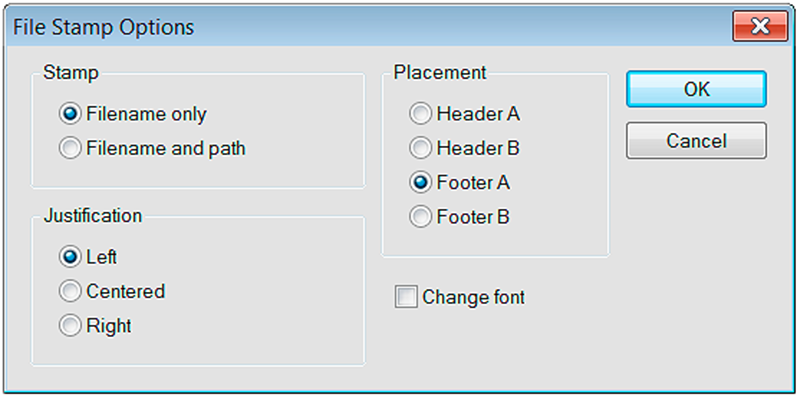
- The macro has its own dialog box with options you can choose. Let’s click on the Filename and Path option, and select Right justification and Footer A.
- Click OK. The macro inserts the document filename in the footer.
Tip: The stamp added to your document is a code, meaning that if you subsequently change the name of the document, the stamp changes, too. This includes the filename itself, and its folder path on your computer.
Navigating the Macro Manager Window
The Macro Manager is a feature new to WordPerfect X7. It lets you take a peek at any macro in the default macros folder. This includes all the built-in macros that come with WordPerfect, as well as macros that you record or make yourself.
There’s a lot going on in the Macro Manager. Here’s a quick rundown of its main features:
- The Macros Foundlist shows all the macros in the default macros folder.
- To play a macro, select it in the list, and click the Run button.
- As you scroll through the list, the Description (Abstract), Descriptive Name, and Preview (if displayed) boxes let you peek inside the currently selected macro.
- The Description (Abstract) and Descriptive Name boxes show metadata entered with the File ▸ Properties box. You can also set these fields inside the Macro Manager by typing text into the box, and clicking Save Changes.
- The Preview box shows the content of the macro file. You can turn this box on or off with the Preview button.
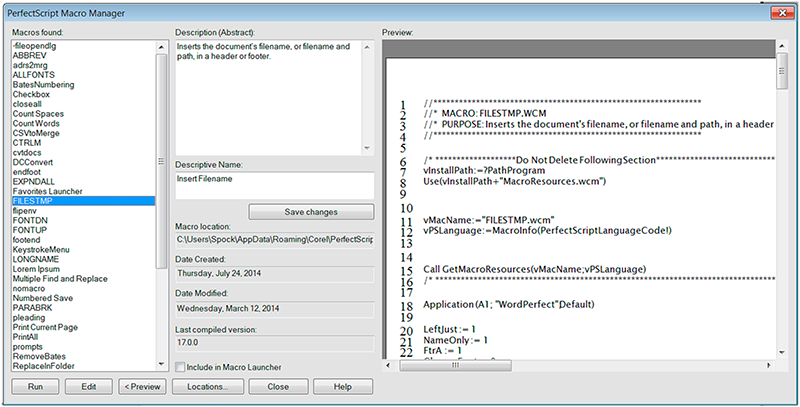
- Macros are standard WordPerfect documents that have programming code in them. You can open a macro for editing by selecting it in the list, and clicking Edit.
- The Macro Manager ordinarily shows macros in your default macros folder. You can add and remove folders to list using the Locations button.
You might be surprised to learn that the Macro Manager itself is a macro! This clearly demonstrates the sophistication that’s possible using the WordPerfect macro feature.
Using a Custom Programmed Macro in WordPerfect
So far we’ve looked at recording your own macros, and playing those that come with WordPerfect. You can also use custom programmed macros that you, or someone else, writes specifically for you. The macro is played back the same as any other.
For this tutorial I’ve prepared an example custom programmed macro called Client/Matter File Saver. It’s a bare-bones – but still useful – utility that helps you organize your documents into client/matter order. The macros allows some basic formatting choices, and you are free to use it as a kick starter for your own simple document management system. There’s a lot going on in the Macro Manager. Here’s a quick rundown of its main features:
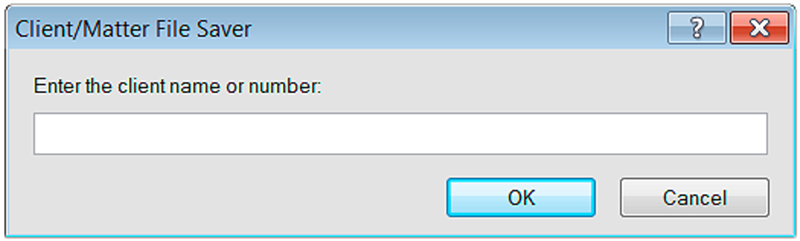
How the Client/Matter File Saver Macro Works
The macro prompts you to enter the client name/number, followed by the matter name/number. With these two pieces of information, the macro:
- Locates (or as necessary creates) a folder with the client name/number. This folder is placed under your regular documents directory.
- Saves the current file into the client folder, using for the filename the matter name/number you provided, along with the current date. The date can be set to either MMDDYY or DDMMYY format.
For example, given the following information
| Client name | Smith | You provide this text |
| Matter name | Trust | You provide this text |
| Today's date | December 15, 2017 | WordPerfect provides this for you |
The file is saved as under your documents directory as:
\smith\trust-121517.wpd
To find your clients’ folders, just open your documents directory by choosing File ▸ Open. Each client you’ve added using the macro will have its own sub-folder. Documents you’ve saved are contained in these folders.
Downloading and "Installing" the Client/Matter File Saver Macro
The Client/Matter File Saver macro is a separate download to this PDF. You may download it here.
Once downloaded, you have to place it in a folder where WordPerfect will find it – we’ll call it "installing" the macro, though it’s really just a simple file copy/paste.
- The macro comes in a compressed folder. You need to use a zip or other compression utility to access it. Move the macro from inside the zip file to your Desktop.
- Copy the macro file to your Windows clipboard by right-clicking over it. Choose Copy from the menu.
- Move the macro into your WordPerfect default macro folder by opening WordPerfect, and choosing Tools ▸ Macro ▸ Play.
- Right-click anywhere in the Play Macro dialog box, and choose Paste. The macro file is copied for you.
- Close the Play Macro dialog by choosing Cancel.
Running the Macro
Using the Client/Matter File Saver macro is super-easy. The simple steps follow, but first, be sure you already have a default location for your personal files. This is where documents you create in WordPerfect are normally saved without your needing to specify a different folder.
- Choose Tools ▸ Settings, and then click on the Files button.
- Click on the Document tab, if it's not already active.
- Look at the Default document folder box. It should not be blank. Assuming a standard installation of WordPerfect , the folder you see should point to your standard Windows (My) Documents directory.
When you use the Client/Matter File Saver macro, client documents will be stored under this folder.
Now let's run the macro. Prepare a document, but don't name and save it yourself. This is the part that the macro does for you.
- Play the macro by choosing Tools ▸ Macro ▸ Play, and select the ClientMatter File Saver macro file.
- When prompted, type in a client name or number. This entry is the name of a Windows folder, so the text cannot contain any characters that aren’t allowed in a Windows filename. This includes : (colon), ?, /, \, and |. Tip: Stick with alphabetical and numeric characters, and you'll be fine. The name is restricted to 25 characters or less.
- When prompted, type in the matter name or number. This entry specifies the first part of the filename for the document (the second part is the current date, as noted above). Once again, don't use any characters that aren't allowed in a Windows filename.
With the client and matter information collected, the macro saves the document in a folder just for this client. If the client folder doesn't already exist, the macro first creates it.
Should a document with a given matter name and date already exist, the macro gives you the opportunity to overwrite it, create a new document using a name you specify, or quit without saving anything.
Making changes to the Macro
You can alter the behavior of the Client/Matter File Saver macro by opening it into WordPerfect, and changing its programming code. I've written the macro so that you can readily change a couple of common options; altering anything else requires more in-depth knowledge of macro programming, which is beyond the scope of this tutorial. See the links at the end of this article on where to find more WordPerfect macro resources.
To edit the macro, first open it by choosing Tools ▸ Macro ▸ Edit. Select the ClientMatter File Saver macro, and choose Edit.
At the top of the macro is a long comment block, informational text that is provided to you, but ignored by WordPerfect when the macro is run. Below it is an section of Editable elements, called variables, which are used to store information for use throughout the macro. What you can change is highlighted in red.
Top level folder
This is the Windows directory that will contain the client folders you create with the macro. By default, the macro uses your documents folder, specified using a special command, PathDocument. This command allows the macro to be used on anyone's computer, no matter where their particular documents folder is located. If you wish, you can insert a hard-coded location here instead. The only requirement is that your Windows username must have full write access to this folder.
Example:
MyPersonalPath = "c:\MyFolder"
Important! Be sure to keep the double-quote marks. The macro will not work without them.
Date format
You can change the format of the date used with the filenames. You may choose between MMDDYY or DDMMYY formats.
For MMDDYY use
MyDateFormat = "Month"
For DDMMYY use
MyDateFormat = "Day"
Global title
You can change the title that appears in all the dialog boxes and message alerts that the macro displays. You might change it contain your firm name, or anything else.
Global Title = "My New Macro Name"
Keep these important points in mind when editing this, or any other macro:
- If you want to change the macro, do it with a copy, in case you make mistakes.
- After making a change, click the Save & Compile button on the Macro Features bar above the document window. Open a new blank document for testing, and run the macro from there. DO NOT run the macro with it in the current document window!
- The syntax (the characters and formatting of the macro) is super-critical. If your changes accidentally alter the syntax the macro, it will not re-compile, and therefore will not run.
- Text that follows // characters are comments, and are for your information. WordPerfect ignores them when running the macro.
Tip: WordPerfect will display a warning message if you’ve made a mistake in the syntax of the macro. Like all programming languages, there are specific rules that dictate exactly how the commands in a WordPerfect macro are used. If you get such an error message, try to go back to where you made the changes. Use an original copy of the macro to compare against.
Where to go for more information and help on Macros
In WordPerfect choose Help ▸ Macro Commands, for a complete list of all the macro programming commands available to you. Use Help ▸ Reference Center ▸ Macros to find additional information.
Download the Macro
You can download the PDF version of this tutorial and the macros:
Getting More from WordPerfect Macros
Be sure to download the ClientMatter File Saver macro